


New to KubeDB? Please start here.
Running Neo4j
This tutorial will show you how to use KubeDB to run a Neo4j database on Kubernetes.
Note: YAML files used in this tutorial are stored in docs/examples/neo4j/quickstart folder in GitHub repository kubedb/docs.
Before You Begin
At first, you need to have a Kubernetes cluster, and the kubectl command-line tool must be configured to communicate with your cluster. If you do not already have a cluster, you can create one by using kind.
Now, install KubeDB CLI on your workstation and KubeDB operator in your cluster following the steps here.
To keep things isolated, this tutorial uses a separate namespace called demo throughout this tutorial.
$ kubectl create ns demo
namespace/demo created
Find Available StorageClass
You will need to provide a StorageClass in the Neo4j CR specification. Check the available StorageClass in your cluster using the following command:
$ kubectl get storageclass
NAME                   PROVISIONER             RECLAIMPOLICY   VOLUMEBINDINGMODE      ALLOWVOLUMEEXPANSION   AGE
local-path (default)   rancher.io/local-path   Delete          WaitForFirstConsumer   false                  12d
Here, we have local-path as the default StorageClass in our cluster.
Find Available Neo4jVersion
When KubeDB is installed, it creates Neo4jVersion CRDs for all supported Neo4j versions. Check the available versions by running:
$ kubectl get neo4jversions
NAME        VERSION                DB_IMAGE                                       DEPRECATED   AGE
2025.10.1   2025.10.1-enterprise   docker.io/library/neo4j:2025.10.1-enterprise                12d
2025.11.2   2025.11.2-enterprise   docker.io/library/neo4j:2025.11.2-enterprise                12d
2025.12.1   2025.12.1-enterprise   docker.io/library/neo4j:2025.12.1-enterprise                12d
Notice the DEPRECATED column. A true value means that version is deprecated for the current KubeDB release and should be avoided. In this tutorial, we will use 2025.12.1.
Create a Neo4j Database
KubeDB implements a Neo4j CRD to define the specification of a Neo4j database. Below is the Neo4j object used in this tutorial:
apiVersion: kubedb.com/v1alpha2
kind: Neo4j
metadata:
name: neo4j-test
namespace: demo
spec:
replicas: 3
version: "2025.12.1"
storage:
storageClassName: local-path
accessModes:
- ReadWriteOnce
resources:
requests:
storage: 2Gi
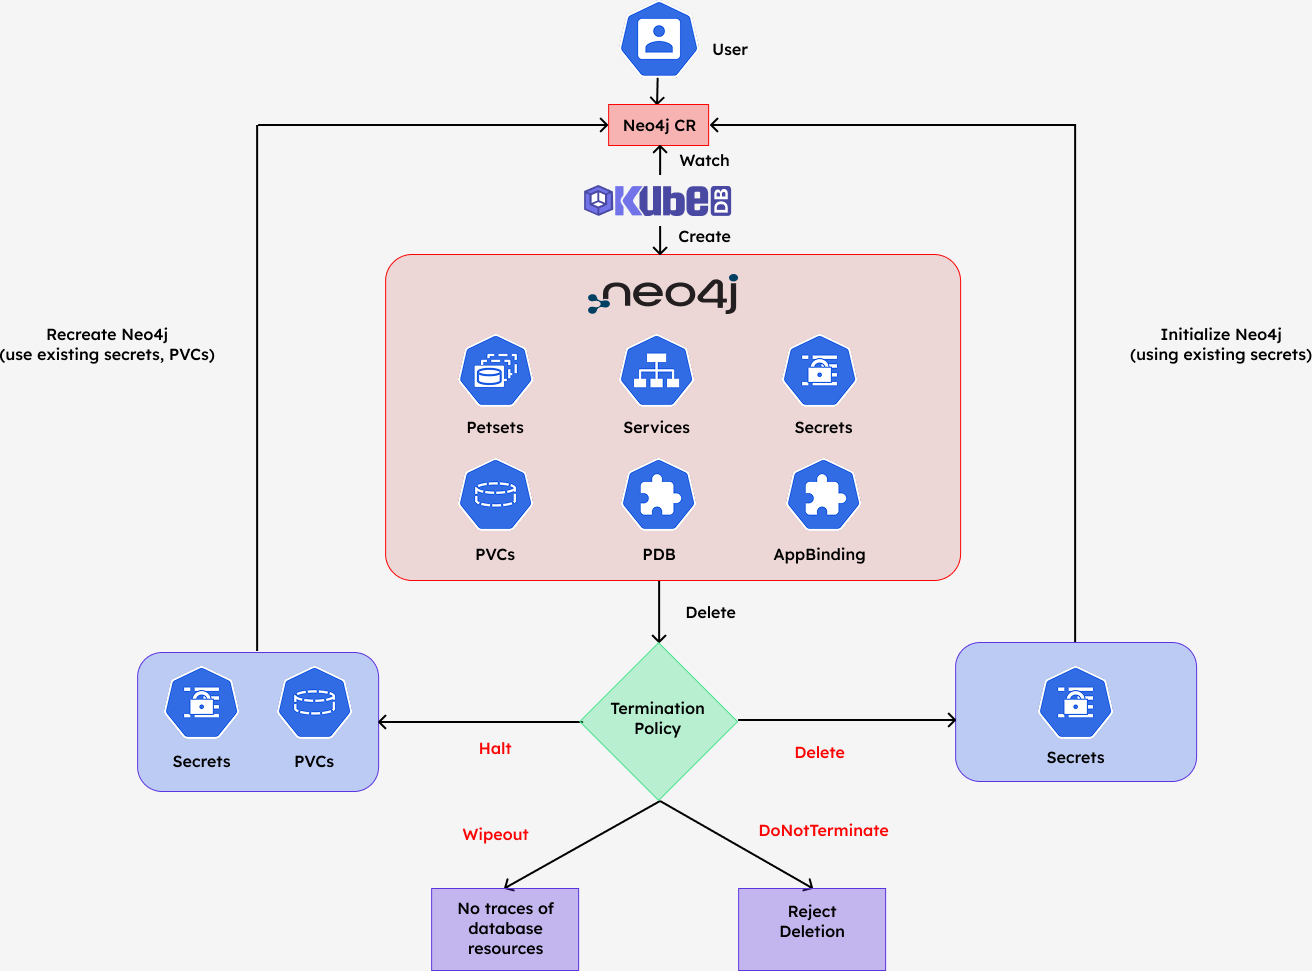
deletionPolicy: WipeOut
Here,
spec.versionis the name of theNeo4jVersionCR specifying the Docker image for each database pod. In this tutorial, Neo4j2025.12.1Enterprise is used.spec.replicassets the number of Neo4j instances in the cluster. Here, a 3-member cluster is created.spec.storagespecifies theStorageClassand size of the PVC that KubeDB will dynamically allocate for each pod. This field is required whenspec.storageTypeisDurable(the default).spec.deletionPolicycontrols what KubeDB does when theNeo4jCR is deleted.WipeOutremoves all related resources including PVCs and Secrets.
Now apply the manifest and watch the cluster come up:
$ kubectl apply -f https://github.com/kubedb/docs/raw/v2026.4.27/docs/examples/neo4j/quickstart/neo4j.yaml
neo4j.kubedb.com/neo4j-test created

$ kubectl get neo4j -n demo neo4j-test -w
NAME         VERSION     STATUS         AGE
neo4j-test   2025.12.1   Provisioning   10s
neo4j-test   2025.12.1   Ready          2m
KubeDB operator watches for Neo4j objects using the Kubernetes API. When a Neo4j object is created, KubeDB provisions a PetSet, one PVC per replica, a ClusterIP Service for client access, and a headless governing Service for pod-to-pod communication. It also auto-generates an auth Secret for the neo4j superuser.
Verify Neo4j Database
Once status.phase is Ready, all three pods are running and the cluster has formed. Let’s verify:
$ kubectl get neo4j -n demo
NAME         VERSION     STATUS   AGE
neo4j-test   2025.12.1   Ready    3m

$ kubectl get pods -n demo -l app.kubernetes.io/instance=neo4j-test
NAME           READY   STATUS    RESTARTS   AGE
neo4j-test-0   1/1     Running   0          3m
neo4j-test-1   1/1     Running   0          2m
neo4j-test-2   1/1     Running   0          2m
KubeDB also creates two Services for the Neo4j cluster:
$ kubectl get service -n demo -l app.kubernetes.io/instance=neo4j-test
NAME           TYPE        CLUSTER-IP     EXTERNAL-IP   PORT(S)                                                 AGE
neo4j-test     ClusterIP   10.43.86.203   <none>        6362/TCP,7687/TCP,7474/TCP                              11m
neo4j-test-0   ClusterIP   None           <none>        6362/TCP,7687/TCP,7474/TCP,7688/TCP,7000/TCP,6000/TCP   11m
neo4j-test-1   ClusterIP   None           <none>        6362/TCP,7687/TCP,7474/TCP,7688/TCP,7000/TCP,6000/TCP   11m
neo4j-test-2   ClusterIP   None           <none>        6362/TCP,7687/TCP,7474/TCP,7688/TCP,7000/TCP,6000/TCP   11m
neo4j-test— the primary ClusterIP Service exposing HTTP (7474), Bolt (7687), and backup (6362) for client access.neo4j-test-0,neo4j-test-1,neo4j-test-2— per-pod headless Services exposing all cluster-internal ports including inter-node communication (7000), cluster discovery (6000), and intra-cluster Bolt (7688).
Connect with Neo4j
KubeDB creates a Secret named {neo4j-name}-auth containing the neo4j superuser credentials. Retrieve them:
$ kubectl get secret -n demo neo4j-test-auth -o jsonpath='{.data.username}' | base64 -d
neo4j

$ kubectl get secret -n demo neo4j-test-auth -o jsonpath='{.data.password}' | base64 -d
Xk9mR2qLpTz3vYwB
Note: Auth Secret name format:
{neo4j-name}-auth. The password is randomly generated on first provisioning.
Connect via cypher-shell
Exec into any pod and use cypher-shell to verify the cluster is accepting queries:
$ PASS=$(kubectl get secret -n demo neo4j-test-auth -o jsonpath='{.data.password}' | base64 -d)

$ kubectl exec -n demo neo4j-test-0 -- cypher-shell -u neo4j -p "$PASS" "RETURN 'connected' AS status"
+-------------+
| status      |
+-------------+
| "connected" |
+-------------+
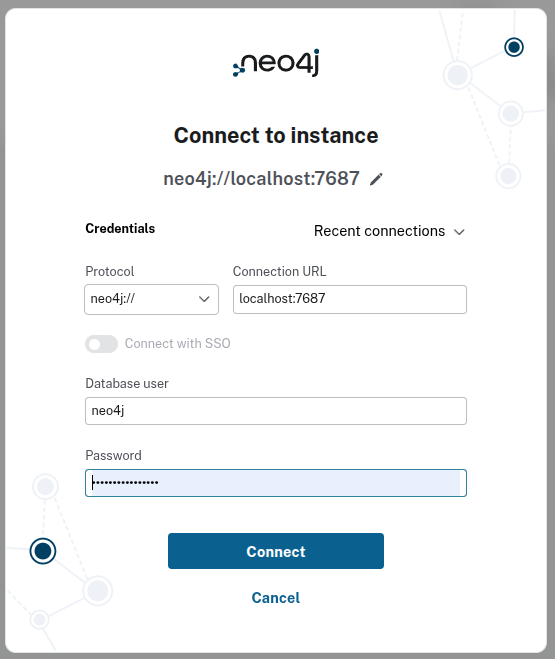
Connect via Neo4j Browser
You can access the Neo4j Browser UI from your local machine by port-forwarding the cluster service:
$ kubectl port-forward -n demo svc/neo4j-test 7474:7474 7687:7687
Forwarding from 127.0.0.1:7474 -> 7474
Forwarding from 127.0.0.1:7687 -> 7687
Now open your browser and navigate to:
http://localhost:7474
On the login screen, enter the following connection details:
| Field | Value |
|---|---|
| Protocol | neo4j:// |
| Connection URL | localhost:7687 |
| Database user | neo4j |
| Password | (from the Secret above) |
After a successful login, you will land on the Neo4j Browser home. You can run Cypher queries directly — for example, SHOW DATABASE lists all databases in the cluster along with their host addresses, roles, and status:

Cleaning up
To remove all resources created by this tutorial:
$ kubectl delete neo4j -n demo neo4j-test
neo4j.kubedb.com "neo4j-test" deleted

$ kubectl delete ns demo
namespace "demo" deleted
Note: Since
deletionPolicyis set toWipeOut, deleting theNeo4jCR also removes all associated PVCs and the auth Secret.
Next Steps
- If your cluster enforces RBAC, review required permissions in RBAC for Neo4j.
- Learn how to perform day-2 operations such as version upgrades, scaling, volume expansion, TLS configuration, and more using the Neo4j OpsRequest overview.
- Detail concepts of the Neo4j CRD.
- Want to hack on KubeDB? Check our contribution guidelines.