


New to KubeDB? Please start here.
Neo4j Cluster Architecture
Overview
KubeDB provisions Neo4j in cluster mode using the Neo4j Cluster topology. Each Neo4j cluster is a set of server instances that cooperate to provide a fully connected, highly available, and scalable graph database. KubeDB strictly follows the modeConstraint: NONE server operating mode, which allows any server in the cluster to perform any role the cluster topology requires.
Cluster Mode: NONE Constraint
Neo4j servers can be constrained to specific roles in the cluster (primary-only, secondary-only). KubeDB does not apply any such restriction, every server is started with:
server.cluster.mode.constraint=NONE
This means:
- Each server can operate as a primary server (hosting a database copy that accepts writes and participates in Raft consensus).
- Each server can also operate as a secondary server (hosting read replicas for scale-out).
- The cluster topology engine assigns roles dynamically based on placement policies and the number of servers available.
- No server is permanently locked to a specific role, which gives maximum flexibility during scaling, version updates, and pod failures.
Operational View
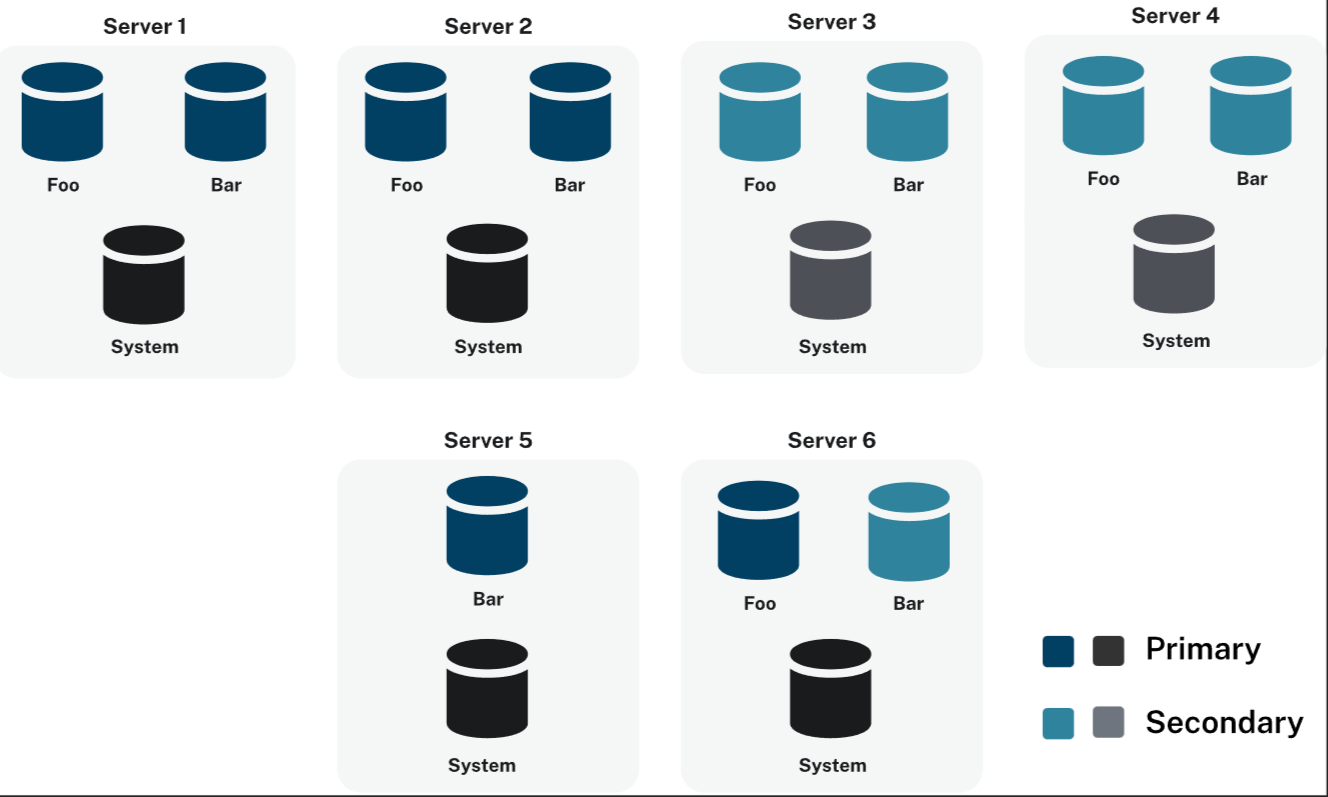
The diagram above shows the operational view of a KubeDB-managed Neo4j cluster. Each pod runs a single Neo4j server instance. Kubernetes services route:
Bolt traffic(7687) to the cluster-level ClusterIP Service{neo4j-name}.HTTP Browser traffic(7474) to the same ClusterIP Service.Intra-cluster communication(7000discovery,6000transaction,7688intra-Bolt) through per-pod headless Services.
Cluster Components
Server Instances
Every Neo4j pod in a KubeDB-managed cluster is an independent server member. The cluster is formed when a quorum of servers successfully complete the discovery and Raft election phases on startup.
With spec.replicas: 3, KubeDB creates:
| Resource | Count | Purpose |
|---|---|---|
| Neo4j pods | 3 | One server process per pod |
| PVCs | 3 | Independent persistent volume per pod |
| Per-pod headless Service | 3 | Intra-cluster communication per member |
| Cluster ClusterIP Service | 1 | Client Bolt/HTTP entry point |
Discovery
Neo4j servers find each other using the per-pod headless Services ({neo4j-name}-0, {neo4j-name}-1, {neo4j-name}-2). These Services expose discovery port 6000 and transaction port 7000, which the Neo4j cluster engine uses to build its routing table.
Raft Consensus
Neo4j uses the Raft protocol to elect a leader for each database hosted in the cluster. With modeConstraint: NONE, any server is eligible to become the Raft leader for a given database. A minimum quorum of ⌊N/2⌋ + 1 servers must be available for the cluster to accept writes.
| Replicas | Fault tolerance | Write quorum needed |
|---|---|---|
| 3 | 1 server failure | 2 |
| 5 | 2 server failures | 3 |
| 7 | 3 server failures | 4 |
Database Hosting
Each logical database inside Neo4j (for example neo4j, system) has its own Raft group and its own elected leader. A 3-server cluster can host multiple databases, each with independent leaders — a server may be the write leader for one database and a follower for another.
Example: 3-Server Cluster
apiVersion: kubedb.com/v1alpha2
kind: Neo4j
metadata:
  name: neo4j-test
  namespace: demo
spec:
  replicas: 3
  version: "2025.12.1"
  storage:
    storageClassName: local-path
    accessModes:
      - ReadWriteOnce
    resources:
      requests:
        storage: 2Gi
  deletionPolicy: WipeOut
$ kubectl apply -f https://github.com/kubedb/docs/tree/v2026.4.27/docs/examples/neo4j/quickstart/neo4j.yaml
When applied:
- KubeDB creates a PetSet with 3 replicas.
- Each pod gets its own PVC and a dedicated headless Service.
- All three Neo4j processes start, exchange discovery packets, and elect a Raft leader per database.
- Once the quorum is established,
status.phasemoves toReady.
$ kubectl get neo4j -n demo neo4j-test
NAME         VERSION     STATUS   AGE
neo4j-test   2025.12.1   Ready    3m

$ kubectl get pods -n demo -l app.kubernetes.io/instance=neo4j-test
NAME           READY   STATUS    RESTARTS   AGE
neo4j-test-0   1/1     Running   0          3m
neo4j-test-1   1/1     Running   0          2m
neo4j-test-2   1/1     Running   0          2m
Verify Cluster Health
Once the cluster is ready, connect via cypher-shell and inspect the cluster topology:
$ PASS=$(kubectl get secret -n demo neo4j-test-auth -o jsonpath='{.data.password}' | base64 -d)

$ kubectl exec -n demo neo4j-test-0 -- \
    cypher-shell -u neo4j -p "$PASS" \
    "SHOW SERVERS YIELD serverId, name, address, state, health, hosting
     RETURN serverId, name, address, state, health, hosting;"
Expected output (3-server cluster, all Enabled and Available):
+----------------------------------------------------------------------------------------+
| serverId | name             | address                              | state    | health      | hosting  |
+----------------------------------------------------------------------------------------+
| "abc..."  | "neo4j-test-0"  | "neo4j-test-0.demo.svc...:7100"     | Enabled  | Available  | ["neo4j"] |
| "def..."  | "neo4j-test-1"  | "neo4j-test-1.demo.svc...:7100"     | Enabled  | Available  | ["neo4j"] |
| "ghi..."  | "neo4j-test-2"  | "neo4j-test-2.demo.svc...:7100"     | Enabled  | Available  | ["neo4j"] |
+----------------------------------------------------------------------------------------+
Check database allocation and current leaders:
$ kubectl exec -n demo neo4j-test-0 -- \
    cypher-shell -u neo4j -p "$PASS" \
    "SHOW DATABASES YIELD name, role, writer, currentStatus, address
     RETURN name, role, writer, currentStatus, address
     ORDER BY name, role;"
Next Steps
- Follow the Neo4j quickstart to provision your first cluster.
- Learn about horizontal scaling to add or remove cluster members.
- Learn about vertical scaling to adjust pod resources.
- Learn about TLS configuration for securing cluster communication.